Hosting Blog with S3 and CloudFront (and Automating the Process with Gitlab CI)
You know that all the hassle of owning (or renting) the server is not worth if you only have a webpage. You need to make sure that your server is updated from security patches, hardened so no one can take over your server, etc. All the maintenance task is tedious and it’s just not beginner friendly.
There are solutions for that; you can do a static web publishing on a github pages, write a blog with medium or dev.to, publish with surge, or do what I do right now: with Amazon S3 and Cloudfront.
Why S3 and CloudFront?
Short answer: because I have AWS certs and want to apply my knowledge hahaha. But there are other reason too: it’s integrated with Amazon-backed CDN, unlike all other options mentioned above. Well, maybe medium and dev.to have CDN too, I dunno. But if they do, it’s not visible from us. And actually I hate medium; there is a subscription model for readers and I don’t wanna burden my readers to pay for my crappy blog. Surge is tempting me; but it does not integrate with CDN, and I need to set up a public repository for my blog’s source files to use Github Pages. Which is fine, until I unknowingly commit a draft for my next post that contains private information. And also Github Pages works seamlessly with Jekyll, which I’m not used to it.
Tech Stack for my Blog
This is the components I use.
- Hugo for building a static web page.
- Gitlab for my blog repository and CI.
- Amazon S3 for holding my static page; html, css, js, and other static assets required.
- Amazon CloudFront for serving and caching my static page. And CDN.
- AWS Certificate Manager for SSL certificate management.
Wait, why I use Gitlab instead of Github? Because I’m more familiar with Gitlab CI than Github Actions. But you can use Github Actions if you prefer.
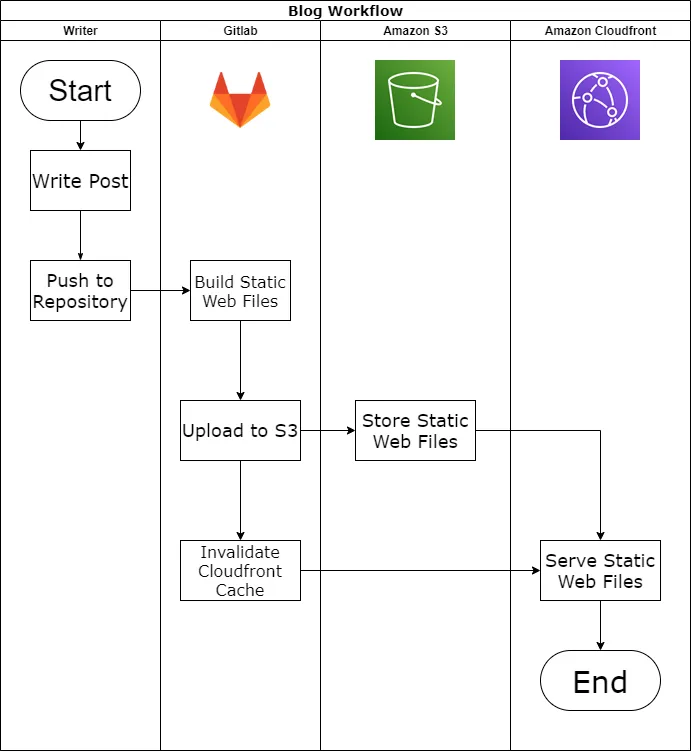
Flowchart for New Post
This is the rough flowchart that I use.

I use Gitlab CI for automatic build and publish to S3 and CloudFront.
Steps for Static Web Hosting
To store the static web files, you should create a new bucket and apply bucket policy in that bucket. The bucket policy should only allow CloudFront identity for read-only access. You can look into my bucket policy below.
{
	"Version": "2012-10-17",
	"Id": "PolicyForCloudFrontPrivateContent",
	"Statement": [
		{
			"Sid": "Allow get object with OAI",
			"Effect": "Allow",
			"Principal": {
				"AWS": "arn:aws:iam::cloudfront:user/CloudFront Origin Access Identity OAISTRING"
			},
			"Action": "s3:GetObject",
			"Resource": "arn:aws:s3:::BUCKETNAME/*"
		}
	]
}
Don’t forget to replace OAISTRING and BUCKETNAME to the appropriate value.
Then create a CloudFront distribution with your bucket as origin, restrict bucket access and define origin access identity, CNAME for your custom domain, redirect HTTP to HTTPS (this is optional btw, but I personally recommend it), use your own SSL certificate (you can import your own or use AWS Certificate Manager to sign your cert if you don’t have any), and default root object (for hugo it’s index.html). All the detail for configuring this is available in official docs of AWS, but next time I’ll post here too.
Steps for Creating New Post
Whenever the writer (me) wanna create a new post, I write a markdown file in my local computer. After I done, I push all files and folders to the repository.
This is the directory structure for my blog repo.
blog/
├───archetypes
├───content
│   ├───blog
│   │   └───(pages.md)   # All content in markdown stored here
│   └───_index.md        # Homepage markdown
├───data
├───layouts
├───resources
│   └───_gen
│       ├───assets
│       └───images
├───static
│   └───images           # Images stored here
├───themes
│   └───hugo-bearblog
│       └───(theme files)
├───.gitlab-ci.yml       # YAML file for defining Gitlab CI. More in below
└───config.toml
To ensure that my blog is built and published to S3+CloudFront I should define .gitlab-ci.yml correctly. This is the content of that file.
stages:
  - build
  - deploy

build:
  stage: build
  image: registry.gitlab.com/pages/hugo:latest
  variables:
    GIT_SUBMODULE_STRATEGY: recursive
  script:
    - hugo
  artifacts:
    paths:
      - public

deploy:
  stage: deploy
  image: registry.gitlab.com/gitlab-org/cloud-deploy/aws-base:latest
  script:
    - aws s3 cp public/ $S3_URL --recursive
    - aws cloudfront create-invalidation --distribution-id $DISTRIBUTION_ID --paths "/*"
Everytime the writer (me) commit and push to repo, GitLab automatically detects .gitlab-ci.yml file and run jobs (stages) defined in that file. The file above contains 2 stages: build and deploy. The build process is generating static html, css, js, and all required files, and the deploy stages is uploading the output from build process (called artifacts) to S3, and then invalidate the CloudFront cache.
For the deploy process notice that I use custom aws cli image provided by gitlab. This image require 3 variables: $AWS_ACCESS_KEY_ID, $AWS_SECRET_ACCESS_KEY and $AWS_DEFAULT_REGION. Make sure to store these variables in the repository. Besides those required variables, I also defined two additional variables for $S3_URL that points to my S3 Bucket URL, and DISTRIBUTION_ID which points to CloudFront distribution ID.
To get a pair of AWS Access Key and AWS secret access key, I create a specific IAM user for this; attached with IAM policy defined below. Make sure to change BUCKETNAME and DISTRIBUTIONID with yours.
{
	"Version": "2012-10-17",
	"Statement": [
		{
			"Sid": "PolicyforGitLabCI",
			"Effect": "Allow",
			"Action": ["s3:PutObject", "cloudfront:CreateInvalidation"],
			"Resource": [
				"arn:aws:s3:::BUCKETNAME/*",
				"arn:aws:cloudfront::ACCOUNTID:distribution/DISTRIBUTIONID"
			]
		}
	]
}
I noticed that when I open this blog page I got permission error. Turns out that default root objects defined in CloudFront doesn’t include subfolder. So, when I access https://ramadhantriyant/, CloudFront will try to do a GET request for index.html. But for the subdirectory (/blog for example), CloudFront does not request a /blog/index.html. Instead, it request for /blog object which is non-existent. Amazon published a “workaround” for this issue using Lambda@Edge. But, after some digging I prefer CloudFront functions instead since the function basically doing a simple URL rewrite. To use it, go to CloudFront > Functions and then Create Function. Type a name and copy this code to Development. Normally, we should test the code but we can skip that and click Publish function.
function handler(event) {
	var request = event.request;
	var uri = request.uri;

	// Check whether the URI is missing a file name.
	if (uri.endsWith('/')) {
		request.uri += 'index.html';
	}
	// Check whether the URI is missing a file extension.
	else if (!uri.includes('.')) {
		request.uri += '/index.html';
	}

	return request;
}
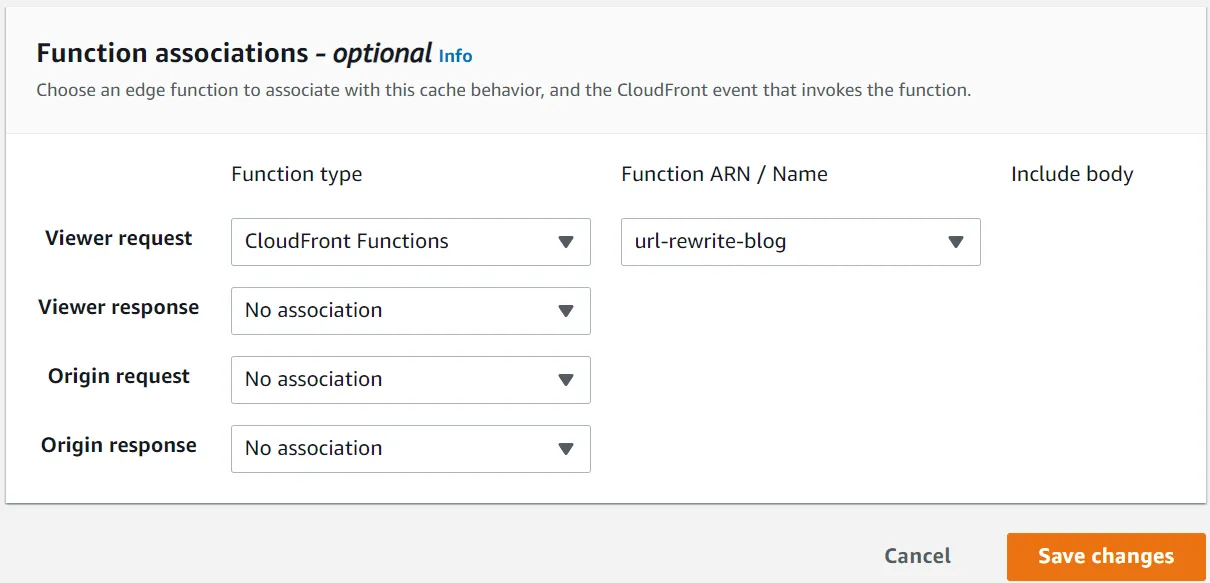
To use CloudFront Functions, we should attach the function to our distributions. Edit our distribution, click Behaviors tab and edit the default behavior. Click Edit and scroll to the bottom. In Function Associations, associate Viewer request with CloudFront Functions and the name of our functions. Don’t forget to save the changes.

ALTERNATIVES: AWS Amplify
Since Hugo is supported by AWS Amplify, the above steps are not required if you use AWS Amplify. Some even says that Amplify much more easier. I can’t comment on that since I haven’t explore it yet, but perhaps I could write about it in another post!